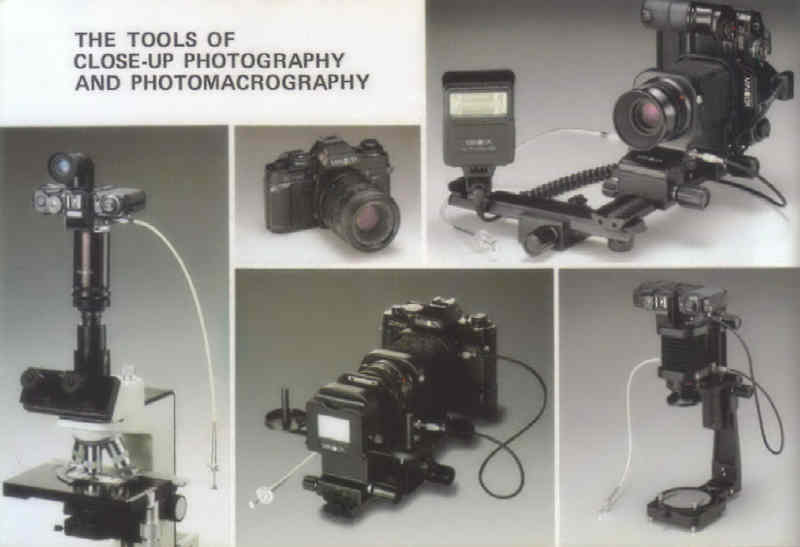
Minolta's Close-up, Macro, and Micro Gear
Some would say that photography is the art and science of isolating subjects. There are several ways to
do this, such as physically removing distracting objects from the picture -- you know, having someone move that
bright green car out of the background. Another approach is to stay in the same spot and just switch to a longer
focal length lens -- closing in on the subject. Either way, that green car is "history". But
the most common approach is to simply move the camera closer to the subject. This allows you to get just
about anything OUT of the picture, with a combination of perspective and depth-of-field. But this latter approach
has one potential roadblock. As you move closer to the subject, you must refocus the lens, and at some point,
you won't be able to focus the lens any closer. At that distance, we reach the close-focusing point of the
lens, and wish the lens would focus "PLEASE, just a little closer".
This is where macro and close-up gear comes in. This area of photography can be kept simple or it can
become complicated due to the plethora of options available to the shutterbug. For many camera manufacturers,
close-up gear is an afterthought. They see it as a special market for just a few odd-balls. Not Minolta.
Minolta has always supplied an admirable offering of a wide selection of superlative close-up equipment.
Here is a summary of the approaches that you can use -- and the comparable equipment that Minolta has made.
Keep in mind that while Minolta made several ways to "get close", there isn't any "best"
way to do it. What's best for you is probably inappropriate for someone else. The approach that you
use depends on how close you want to get, and the close you are to your bank account.
Close-focusing lenses -- not to be confused with supplementary lenses (see below), these
are just regular lenses that focus closer than "normal". Typically, regular lenses will focus to
about 1/10 life size, which means that the subject is about 10 times the size of the image on the negative. This
is about as close as most people need to get, and making a lens that focuses closer than this increases the production
cost noticeable. There are two approaches that can be used to allow a lens to focus closer. First, the focusing
tube can be made to extend a little longer than normal. This is an inexpensive approach if the extension
is minimal, but a minimal increase in the extension will only produce a minor increase in the magnification. The
other approach is optical. With this approach, extra glass elements are added to the lens and are engaged
with a special macro button or lever. This moves these additional elements into a special position inside
the lens to create additional magnification. While capable of increasing the magnification significantly,
this approach requires additional glass and a more complicated lens design. Typically, these higher-end close-focusing
lenses will allow a photographer to reach 1/5 or 1/4 life size. Additionally, these lenses produce very soft
edges in the pictures, so it's best to stop-down the lens dramatically. For the best results, this means
a long shutter speed, a tripod, and a cable release -- or a powerful flash unit. Minolta made and sold several
lenses that had close-up capability. These are listed in the MINMAN lens directory. But
remember, this means that you can focus just a little closer than normal. For example, the older 80-200mm
MD Zoom Rokkor-X could focus to 6 feet. The newer 75-200mm MD Zoom Rokkor-X , with close-focusing capability,
could focus to 4 feet. Helpful, but not a dramatic change. Finally, keep in mind that many other companies
made close-focusing lenses that will fit on Minolta cameras.
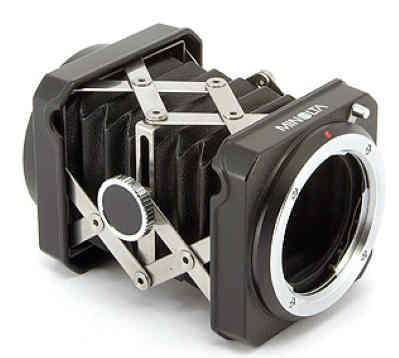
Reverse adapters -- available in different styles and sizes, these adapters allow you
to make the most of the gear you currently have. Minolta made two reverse lens adapters -- the Reverse Adapter
I and the Reverse Adapter II. These adapters are nearly identical, and screw into the filter thread of a
lens. It has a Minolta bayonet mount on the other side, so the lens can be placed on the camera body BACKWARDS!
Why would you want to do this? It provides extreme close-up focusing with or without a bellows. The
reverse adapters were available in 49mm and 55mm thread sizes, but can be used on lenses with different filter
thread sizes through the use of step-up or step-down rings. Other companies made Minolta reverse adapters
as well, but they are a somewhat lesser quality.
Supplementary lenses -- often called close-up lenses, close-up filters (CU filters), or
supplementary filters, the supplementary lens is an actual optical lens that looks like a filter and acts like
a filter -- since it is screwed onto the front of a regular lens. Simply put, they are a magnifying glass
and make the image bigger. They come in difference strengths. Minolta made quite a variety of top-notch
supplementary lenses, for many of their cameras and meters -- TLR, 35mm, 16mm, 110, disc, etc. Some were built
into the cameras, while others were available as accessories. While most close-up lenses are single element,
uncoated optics, the Minolta offerings are two element, coated optics offering superior correction of chromatic
aberration and flare reduction. Even so, for the best results, you should stop down the lens as much as possible.
One of the best reasons to use close-up filters is their ease of use. If you need to "get closer",
just screw on one (or more) of these lenses. And no exposure compensation is needed -- unlike some of the
other approaches (see below). Minolta's 35mm SLR close-up lenses were available in the following filter threads
and diopter strengths. (Diopers are a measurement of distance, equal to a fraction of a meter. For example,
a +1 diopter lens sets the focus at 1 meter, while a +2 diopter sets it at 1/2 meter (500 millimeters), and a +3.8
diopter sets it at 1/3.8 meters (263 millimeters), etc. This is true regardless of the focal length of the
lens on the camera:
- 49mm -- #0 (+0.94 diopter), #1 (+2 diopters), and #2 (+3.8 diopters)
- 52mm -- #0 (+0.94 diopter), #1 (+2 diopters), and #2 (+3.8 diopters)
- 55mm -- #0 (+0.94 diopter), #1 (+2 diopters), and #2 (+3.8 diopters)
- 72mm -- This is a special CU filter, designed for use on the 100-500mm zoom lens but usable on any medium to
long telephoto with a suitable filter thread or adapter. It has a diopter of +0.37. Three versions exist -- yellow
inscription on the distance scale (MC version), orange inscription on the distance scale (MD Rokkor), blue inscription
on the distance scale (MD Minolta) -- but they are apparently all the same optical design -- except for the coloring.
The 100-500mm zoom close-focuses to 8.2 feet. This CU lens sets the focus at 8.5 feet when the lens is set at infinity,
and much closer focusing is possible using the focusing ring.
- 77mm -- This is a special CU filter, designed for use on the 80-160mm zoom lens but usable on any medium telephoto
with a suitable filter thread or adapter.
There are actually four styles of Minolta CU lenses for 35mm SLR cameras -- the difference being the engraving.
The first series has "for SR" marked on the side of the lens, and the diameter is marked as '55N', for
example. These have a satin black finish. The second series drops the "for SR" engraving, and now has
the diameter marked as "55mm", for example. In addition, these now have a glossy black finish. In the
third series, the diameter is still marked as "55mm", BUT with a Greek diameter insignia in front of
it -- ø -- so as not to confuse the user into thinking that this CU lens is a 55mm (or whatever)
lens. These CU lenses retain the glossy black finish of the previous series. The fourth series replaces the old-time
Minolta font with a smaller, plainer font. The diameter is still marked as "55mm" with a Greek diameter
insignia in front of it -- ø -- . These CU lenses retain the glossy black finish of the previous
series. Here's a table to straighten things out.
Minolta close-up lenses and available diopters
| |
Series 1 |
Series 2 |
Series 3 |
Series 4 |
| 49mm |
-- |
-- |
#0,#1,#2 |
#0,#1,#2 |
| 52mm |
#0,#1,#2 |
-- |
-- |
-- |
| 55mm |
#0,#1,#2 |
#0,#1,#2 |
#0,#1,#2 |
#0,#1,#2 |
Many other companies made screw-in, close-up filters that will fit on Minolta lenses, however these are almost
always single-element, uncoated optics that will produce some color fringing on the edges of objects due to the
chromatic aberration. Many are as expensive as the better-quality Minolta offerings. Minolta's supplementary lenses
will get you very close, very economically, very easily. For many people this is as close as they need to
get. Other people discover that when they get this close, they want to get even closer! It's just one
of the built-in risks of close-up photography. Once you see the petals on a flower, you'll want to see the
stamen!
Tele-converters -- tele-converters are an inexpensive way to get closer than normal. While
they increase the focal length of the lens with which they are used, they have the added feature of increasing
the magnification. Although the lens doesn't focus any closer than it did without the tele-converter, the
image on the film is larger than before the converter was used (3 times as big if a 3X converter is used). Typically,
these lenses produce very soft edges in the pictures, so it's best to stop-down the lens dramatically. Minolta
made and sold several tele-converters that provide this close-up capability. These are listed in the MINMAN
lens directory. Some tele-converters are made to convert into extension tubes (see below) to offer even
greater close-up magnification. These are referred to as close-up converters or macro-converters. Minolta
did not make any converter of this type, but other companies made these converters that will fit on Minolta cameras.
You can achieve the same effect by placing an extension tube behind a lens and then placing a tele-converter
in front of, or behind, the extension tube (see below).
Extension tubes -- As you focus a lens closer, the lens is physically moved away from
the camera and film. An extension tube is simply a tube that fits between the lens and the camera, and creates
more of this light-tight extension. The more extension, the closer you can focus -- and the magnification
increases. Minolta made four sets of extension tubes:
- SR Extension Tube Set: The first set of extension tubes from Minolta has a chrome finish and gives a
variable extensions from 7.5mm to 67.5mm. The set consists of five parts, numbered 1 through 5. #1 and
#5 are always used, but the others are optional, if more extension is needed. These were developed before
meter-coupling, and so are completely manual in operation. If your camera has a TTL meter, the correct meter
reading will be produced by the camera, but the viewfinder will get very dark, especially if you stop-down the
lens.

- SR Extension Tube Set II: Similar to the SR Extension Tube Set, the SR Extension Tube Set II is completely
manual in operation. They have a black finish and give extensions from 7mm to 56mm. There were actually
two versions of these tubes. On the later model, the bayonet surface of the EB ring (front ring) is slightly
recessed on the outer edge, so that the MD tab on MD lenses can move freely.

- MC Auto Extension Tubes: A set of three tubes that can be used alone or in combination, and have auto-diaphragm
and meter coupling connections built in. Instead of being labeled with a number, they are marked with the
actual amount of extension -- 14mm, 21mm, and 28mm. The lens stays open to the maximum aperture, but the
lens is able to tell the meter what the set f-stop is. Very convenient, but more expensive.

- MD Auto Extension Tubes: These are the same as the MC Auto Extension Tubes, but there are a few cosmetic changes.
On the MC Auto Extension Tubes, the toothed ridges are about 2mm wide and 2mm apart. On the MD Auto Extension Tubes
they are about 1mm wide and 1mm apart. Pick your poison -- in real life it makes no difference at all. But that's
not the only difference. On the MC Auto Extension Tubes the MC ring and the rear flange are bright aluminum. On
the MD Auto Extension Tubes the rear are anodized black metal. Despite having the "MD" in the name,
the MD Auto Extension Tubes do not provide the MD function with any lenses.

Many other companies made various extension tubes, with various features and lengths, that will fit on Minolta
cameras. The cheap ones can actually be physically painful to attach and remove to the camera, with sharp
"buttons" that can easily tear your skin. If you want a comfortable experience, get the Minolta
tubes. Although Minolta never made extension tubes with the MD feature, other companies did, such as Vivitar.
Macro lenses -- a true macro lens has two features. First, it allows a magnification
of 1x (life-size) or greater. Most lenses that are labeled as "macro" do not meet this test. In
addition, a true macro lens has a flat field of focus. While regular lenses have a slight curve to what they
focus on, the macro lens can focus all corners of a flat object at the same time. Again, most lenses that
are labeled as "macro" do not meet this test. Minolta made and sold several lenses that were true
macro lenses, in 50mm and 100mm lengths . These are listed in the MINMAN lens directory.
Many other companies made macro lenses that will fit on Minolta cameras. Some are great performers.
Bellows -- think of a bellows as a variable length extension tube. Minolta made
several bellows units over the years:
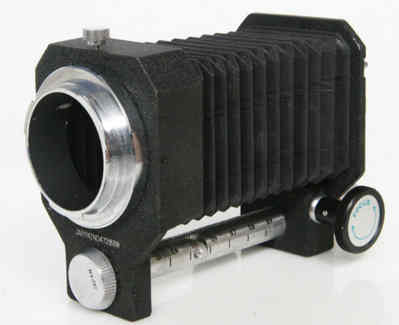
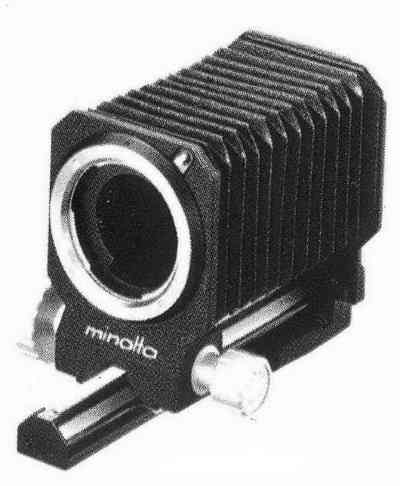
- Bellows -- The original Minolta bellows. Designed for the SR-2 camera which lacked a TTL meter, this
bellows was easy to use, but required calculations to compensate for light loss. A bellows decreases the
light that reaches the film and the amount can be determined with a formula using the the focal length of the lens
and the amount of extension on the bellows -- and a piece of paper and a pencil. OK, so it was slow, but
it worked. And with a little practice, it's easy. This model is a short, single rail bellows with a
twist, of sorts. When the bellows is compressed, the rail can be folded up, and the entire unit will fit
just about anywhere. While it offers very few convenience features, the first Minolta Bellows, is a rugged,
go-anywhere bellows. It was THE backpackers bellows until the Compact Bellows (see below) came along. This
model is sometime, incorrectly, referred to as the Minolta Compact Bellows. It is compact, but it is not
the Minolta Compact Bellows (see below).
- Bellows II -- This bellows is often referred to, mistakenly, as the Minolta Extension Bellows, but that's because
of what was written on the box. But Minolta officially designated it as the Minolta Bellows II. After all, any
bellows is an "extension bellows". This model is very different from the original bellows model. It
is a deluxe version in that it has much more extension -- about 180mm -- and accessories, to boot! First,
it had dual rails, unlike it's predecessor which made it a very sturdy bellows. But it added extra features to
the standards. While the front standard does not lock, it has a very secure movement so it will not slip, once
set. The rear standard is no longer fixed in place. It will move along the rail, as well, and locks with a small
tab. The rear standard is sufficently raised so that any Minolta 35mm SLR (excluding the ER) can be accomodated
-- as long as a motor drive is not attached. The rear standard even rotates, but this feature is only available
when the rear standard is set at the back position. The rails lacks any distance markings because of the adjustable
rear standard, but the bellows has a tripod socket near the rear. It also has a removeable negative/slide
copier as an accessory. It is designed for lenses with a 55mm filter thread, but an accessory ring was available
to allow it to accept lenses with a 52mm filter thread. The copier is attached to rails with an adjustable distance
depending on the lens used and the magnification desired. It was designed for negatives, but is adjustable for
use with slides. In many ways the Bellows II is similar to the Auto Bellows I -- which replaced it -- but without
the automatic diaphragm feature.
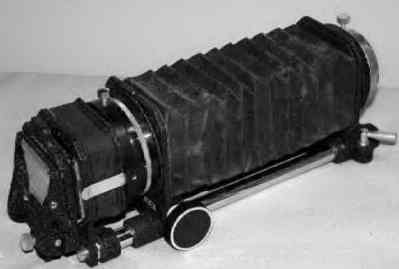
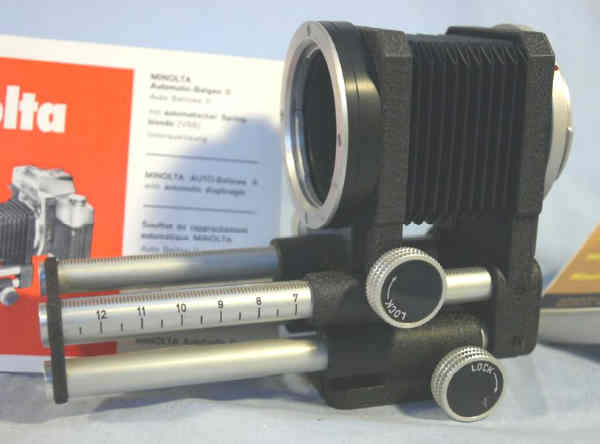
- Auto Bellows I (AB I) -- The Auto Bellows I was a star -- in its time. It's claim to prominence
was the fact that it was an automatic aperture bellows. All the bellows from other manufacturers, at the
time, were manual aperture bellows which meant that as you stopped down the lens, the lens diaphraghm stopped down
-- and the image became darker and darker. This was a significant problem with a bellows since the bellows
(naturally) substantially reduced the light in the viewfinder -- even at maximum aperture. The result was
very dark viewfinders, out-of-focus pictures, and incorrect TTL meter readings. The solution, of course, was the
Auto-Bellows I. With this bellows, the lens stays at maximum aperture until the very moment of exposure.
While the auto-aperture was convenient, the setup lacked any connection to the meter in the camera, so the
metered reading needed to be taken in stop-down mode. While this was a drawback from the TTL metering system,
it was no different from the typical bellows systems at the time. You could buy the bellows by itself, but Minolta
primarily sold it as a kit -- in a suitcase -- with the macro stand, slide copier, film holder, etc. The
only substantial shortcoming of this outfit is that the rear standard is fixed in place, so using short lenses
is very difficult -- the front of the bellows keeps bumping into the subject!
There are actually TWO versions of this bellows, although they are not marked or designated as different by Minolta.
Like the Bellows II, the Auto Bellows I used dual rails. Unlike the rails of the Bellows II, the right-hand
rail has markings for the amount of extension -- in millimters. These are simply used to determine the amount
of exposure compensation that is needed -- when a NON-TTL camera is being used. When this Bellows was first
produced, Minolta's stardand lenses were 55mm focal lengths (f2.0, f1.8, and f1.7). Minolta added an exposure
compensation scale on the left-hand side of this Bellows -- in f-stops -- for easy use.
The later version of this Bellows dropped this 55mm exposure compensation scale when Minolta branched out into
standard lenses of other focal lengths, from 45mm to 58mm. There are two ways to determine which version
you have. Look at the left hand rail and see if it has markings for a 55mm lens. Also, the original
version came in a plain, colored box, Marked "Minolta Auto Bellows I". The later version came in
a similarly marked box, but it is all plack with a large photograph on top.
Both versions used the same accessories -- slide/film copier, focusing rail, and macro stand.
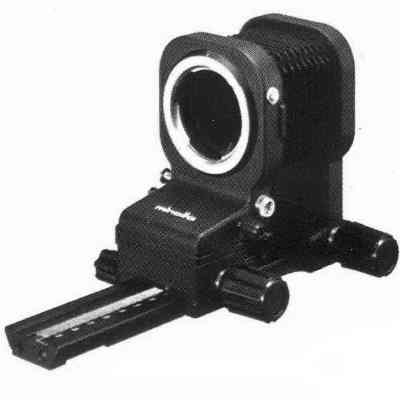
- Auto Bellows II (AB II) -- The ABI was great, but WAY too expensive. This model was smaller and lighter
than the AB I, with somewhat limited features . It was made by Novoflex (which sold an identical model itself),
had a permanently fixed focusing rail and accessory slide copier. But the changes were not enough to significantly
reduce the price. It was short-lived and replaced by the Bellows III. It is harder to find than the
nearly identical Novoflex model. It did NOT use the same accessories as any other Minolta bellows -- unfortunately.
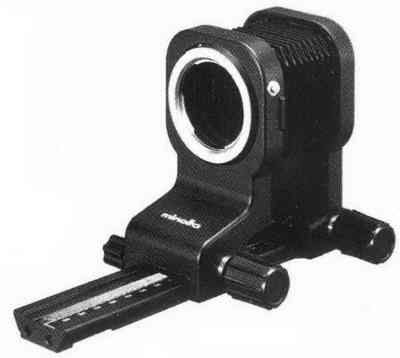
- Bellows III -- An updated version of the Bellows I, but it was designed to use most of the accessories
of the Auto Bellows I.
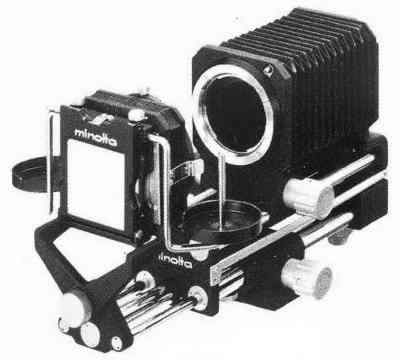
- Auto Bellows III (AB III) -- This model confuses a lot of people because they think it had some connection
to the Minolta Bellows III. Let me assure you that they are completely different animals. The Auto
Bellows III is an update of the Auto Bellows I and Auto Bellows II, not an updated Bellows III. The Auto
Bellows III is the dream machine. It is an improved Auto Bellows I with the advantage of shifts and swings -- with
rear mount focus. The standards are moved higher so that cameras with motor drives can be attached. It
retains the auto-diaphragm ation, but it does it in a different way. It uses a special set of cable releases
-- in series -- that operate the lens diaphragm and the camera shutter at the same time. It works in much the same
way the "double cable release" -- used by other manufacturers -- but provides a little more flexibility.
The front lens standard can be reversed to allow for reverse lens use and additional extension -- quite a
concept!
- Bellows IV -- This is a simpler version of the AB III, without the bells and whistles. It is not
merely an improved Bellows III. No auto-diaphragm feature and no swings and tilts, but most people don't
need these advanced features. This is the best bellows for most Minolta users.
- Compact Bellows -- The Compact Bellows is a revolution is design and appeared late in the Minolta line. In
the "closed" condition, you would not suspect that it was a bellows -- or even a piece of photographic
equipment. The reason for its unique appearance and operation is its radical design. Instead of using a conventional
bellows rail, it uses a set of four collapsible struts around the four sides of the bellows. This allows
it to collapse upon itself and disappear into a protective, little box! Sure, its extension is short, and it lacks
any convenience features -- but with a TTL meter, you can still take great macro pictures. All you have to
deal with is the lack of meter-coupling, and lack of an auto-diaphragm. The viewfinder gets darker as you
stop down, but the TTL meter automatically compensates -- COOL. This is the perfect bellows for a backpacker.
Many other companies made bellows that will fit on Minolta cameras. Bellows units typically have accessories
that are designed for special purposes, and Minolta made several of these:
- Bellows lenses -- Minolta made and sold several lenses designed for use on a bellows -- from an unbelievable
12mm to 135mm. These are all true macro lenses in which the focusing tube has been removed . This is
what makes bellows lenses different from "regular" lenses -- the focusing "tube", or "mount"
is provided by the bellows. The optics can be the same, but the lens does not have a focusing ring. This
is created by the bellows. The various Minolta bellows lenses are listed in the MINMAN
lens directory. But keep in mind that ANY Minolta lens will fit on a Minolta bellows. It's just
that certain Minolta lenses were DESIGNED to be used on bellows. Many other companies made bellows lenses
that will fit on Minolta bellows, and most enlarger lenses can be used as well..
- Focusing rail -- a rail that is attached to the bottom of the bellows to make focusing easier. It can
be used on the bottom of a camera -- without a bellows -- for easier focusing with a macro lens, extension tubes,
etc.
- Slide copier -- attached to the front of the bellows unit, it allows the easy reproduction of negatives and
slides.
- Macro stand -- attached to the front of the bellows unit, it allows for the reproduction of small objects like
coins and stamps.
- Film holder -- attached to the front of the bellows unit, it allows the reproduction of negatives when used
with a slide duplicator.
Microscopes -- OK, this gets a little complicated. First, you need to connect the camera
to the microscope. You'll need an adapter for this. Then, you need to connect a lens to the microscope.
You have a lot of options here. No, Minolta did not make microscopes, but they did make microscope
lenses. And to confuse things even more, you can use your Minolta camera on most microscopes -- with or without
a Minolta microscope lens -- but you need an adapter for the camera. The microscope lenses that Minolta sold
are listed in the MINMAN lens directory and were made in 12mm and 25mm sizes. Minolta
also marketed microscope lenses from Leitz (that's right, Leica) in the 12 and 25mm focal lengths. These
microscope lenses can be used on most microscopes without an adapter, or on a Minolta-style bellows with an adapter.
Keep in mind that other microscope optics can be used on the same adapters. And to confuse matters
even more, Minolta made different adapters to fit Minolta cameras onto microscopes. These can be used on
many microscopes, but they can not be used with other cameras:
- Microscope adapter -- consists of four parts:
- Camera mount -- to attach the camera to the unit
- Barrel -- to provide extension between the camera and microscope
- Microscope mount -- to attach the unit to the microscope
- Shade tube -- used when an eyepiece optic is not used
- Microscope adapter II -- same as the original, with minor cosmetic changes.
Get creative -- keep in mind that close-up gear can be mixed and matched for increased
versatility. For example, a macro lens or microscope lens can be placed on a bellows for even closer results
than you would get from a normal bellows lens. Place a tele-converter on the back of a set of extension tubes and
you've effectively doubled the amount of extension and increase the magnification dramatically.
Additional gear -- To make the use of this macro gear quite a bit easier to operate, Minolta
made several accessories, such as eyepiece adapters, cable releases:
- Cable Release -- usable with any camera with a cable release connection. This is a typical cable release with
a locking screw on the top and a metal cover.
- Cable Release II -- an updated, top quality version that appeared in 1976. It's much longer and has a new quick-action,
lock/release tab on the top. It lacks the standard locking screw, and has a more convenient locking tab that can
be set for ON and OFF by roatating it slightly. In the OFF mode, the cable release does not lock and releases as
soon as you remove your finger. In the ON mode, the cable release stays locked, even when you remove your finger.
To unlock the cable release, you simply press the locking tab. It has the added advantage of having a thick
plastic cover over the entire length of the cable release with white nylon fabric underneath. It is a very
rugged cable release that is very easy to use and very comfortable. This cable release was made with the older
Minolta logo as well as the new one.
- Cable Release III -- an updated, version of the cable release II that appeared in 1979 with the introduction
of the Powere Grip I. It was dessigned to be used with the Minolta Power Grip I and Power Grip II and was made
slightly different from the Cable Release II. First, it is slightly longer, but only by an inch or so. Secondly,
the release tip is made slightly wider to fit snuggly into the Power Grip -- the cable Release II will slip out.
Third, the Cable Release III has a plastic tip on the end which is undoutedly designed to work better with the
Power Grip in some way. It has the added advantage of having a thick plastic cover over the entire length
of the cable release with black nylon fabric underneath. It is a very rugged cable release that is very easy
to use and very comfortable. This cable release was made with the older Minolta logo as well as the new one.
- Cable SP -- an electronic release on one end (see below) and co-axial connection on the other for connecting
to numerous gear
- Remote Cord S (8035-100) -- A short, 20 inch, cable release with an electronic release on the camera end. Only
usable with XD, XG, and later cameras with a cable release connection. These cameras had a special cable release
connection that allowed stadard, mechanical cable releases as well as the new, electronic Remote Cords S &
L. These cables do not need batteries, even though they are electronic. The electricity is provided by the camera.
Not to be confused with the other Remote Cord S.
- Remote Cord L (8035-200) -- A long, 16.5 foot, cable release with an electronic release on the camera end.
Only usable with XD, XG, and later cameras with a cable release connection. These cameras had a special cable
release connection that allowed stadard, mechanical cable releases as well as the new, electronic Remote Cords
S & L. These cables do not need batteries, even though they are electronic. The electricity is provided by
the camera. Not to be confused with the other Remote Cord L.
- Remote Cord S (8034-300) -- A medium length, 3.3 foot, cable release with an electronic release on the camera
end. Only usable with XK MOTOR camera. This camera had a two cable release connections. The first is a standard
in the normal location that allows a stadard, mechanical cable releases. The second is on the motor drive and allows
the new, electronic Remote Cords S & L. These cables do not need batteries, even though they are electronic.
The electricity is provided by the camera. Not to be confused with the other Remote Cord S.
- Remote Cord L (8034-400) -- A long, 16.5 foot, cable release with an electronic release on the camera end.
Only usable with XK MOTOR camera. This camera had a two cable release connections. The first is a standard
in the normal location that allows a stadard, mechanical cable releases. The second is on the motor drive and allows
the new, electronic Remote Cords S & L. These cables do not need batteries, even though they are electronic.
The electricity is provided by the camera. Not to be confused with the other Remote Cord L.
- Power Grip I -- The Power Grip I first appeared in 1979. The Power Grip I performs several functions, each
of which may be important to some photographers. First, it is a bracket for the camera. It attaches to the tripod
socket of the camera, and allows you to hold the camera more comfortably. The handle has a flash shoe on the top
so that you can add an additional flash unit -- or simply move a single flash further off of the camera. Third,
it provides a built-in battery supply for the flash, but this will only work with the compatible Minolta Electroflash
320 flash units. The Power Grip I can be positioned for use with the left or right hand, and the camera can be
positioned in several places. The Cable Release III can be added, and with a motor drive and flash units attached,
operation of the camera is fast and easy. The Power Grip I uses rechargeable battery packs, but can be used without
any battery.
- Power Grip II -- An updated version of the Powere Grip I with the following features.
ring lights, and focusing screens to be added.
RETURN TO THE MANUAL MINOLTA HOME PAGE
We didn't want to do this, but since other websites have been stealing our stuff, we have no alternative but
to state:
COPYRIGHT@1995-2019 by Joe McGloin.
All Rights Reserved. The material on this website is protected by US Federal copyright laws. It cannot be copied
or used in any manner without specific approval from the owner.
The material on this website is protected by US Federal copyright laws. It cannot be copied or used in any manner
without specific approval from the owner.