
THE CREATIVE CORNER
One half of the reel fits into the other half. First disassemble the reels. Then, take a hack saw and cut down the center spindle of one or both halves of the reel to size. Err on the side of making the spindle too big as you can easily file or sand the plastic down to size. Use a scrap of 16mm film for sizing. You can then epoxy or silicone (once you've confirmed the proper size) the sides together . Depending on the reel you are using, you will probably need to "pop out " the little metal BBs, since you'll lose the ratcheting action. This is no big deal since the 16mm film slides in easily for loading. I 'spose you could do this for 9.5mm or even 8mm, but the reel ridges are relatively large for this tiny film.
Next time you see a used Paterson reel try it out....
And if you are a Minox user, try this. I though of this idea and though I was really clever, then I saw Minox's developing tank, and decided that I wasn't so hot after all :). To simplify things, it's a Minox developing tank made out of PVC pipe. I used half inch pipe filled with lead shot with both end caps glued on and rubber o-rings are used to hold the film. Don't use recessed endcaps, as OD endcaps prevent the emulsion from touching the walls of the outer container. For the shell I used 1 inch _thin walled_ PVC pipe with end caps. Think walled will not allow the end caps for the half inch pipe to fit. I wrap the outer "shell" with electrical tape, because PVC pipe isn't light proof. Then I develop in low light (generally a good idea with any developing tank). The only problem is that you have to pour the chemistry out and put it in in complete darkness, since you have to pull one end cap off of the outer shell. I spiral the film up along the half inch pipe with the emulsion side out, making sure the film does not overlap itself (gotta use those cotton gloves for this). Place the film and the 1/2 inch tubing in the larger shell, pour the developer in, and cap it. This system uses only 1.75 oz of chemistry to develop 36 exposure rolls. One could make that amount even less if they made a 15 exposure tank.
Here's another trick for Minox users who can't find a Minox reel for their tank (or because they can't figure out how to use a real Minox tank correctly!). As mentioned above, there are lots of plastic (NOT BAKELITE) developing tanks out there, and enough of them have 16mm reels -- most adjustable, such as Paterson and Yankee. Both made tanks in different styles. The Yankee Master Development tank comes with two adjustable reels from 120 down to 16mm. In the 16mm position, there is a small tab that keeps the reel at 16mm wide. If this tab is removed with a saw, knife, hacksaw, etc. the reel can be further collapsed for Minox film use.
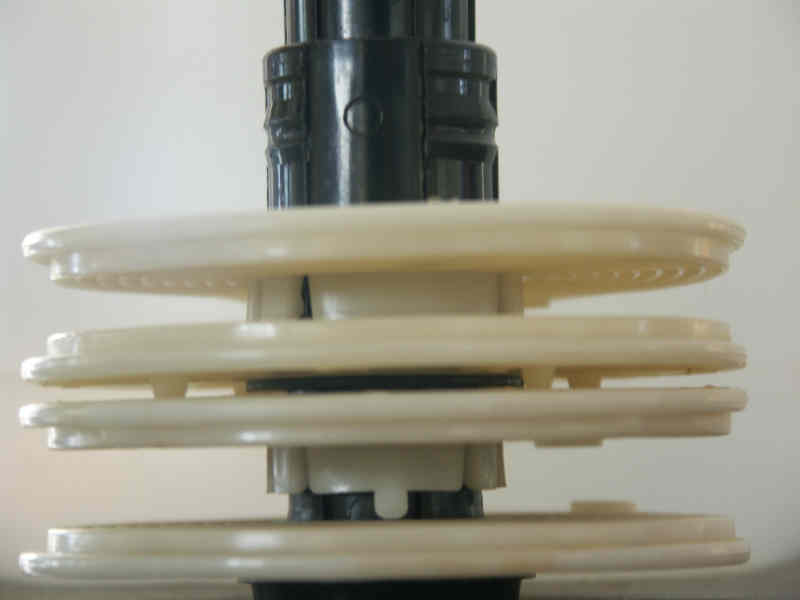
In the picture, the bottom 16mm reel shows the tab as manufactured. The upper 16mm reel shows the tab removed and the reel compressed. A simple, cheap, five minute procedure. The ratcheting action is NOT lost on the Yankee reels, as mentioned above, but use it carefully. PLUS, with the Yankee Master reels, they can still easily be popped back for regular 16mm use!!!
Other plastic 16mm reels, without these tabs, can simply be cut or ground down to a 10mm width.
Here's another approach that works with just about any short strip in any format:
Cut a strip out of a two-liter soft drink bottle that's the width of a strip for your reel -- 35mm,120, whatever
film. (Do this in the light of course)
Then, tape ONE end of the film -- 8mm, Minox, 16mm, 17.5mm, etc. -- emulsion-side-out, onto the plastic strip (Do this in the DARK, of course).
Thread it into one of your daylight tank spools and tape the other end of the film strip. Process it as usual. Vinyl electrical tape holds pretty well.
If the strip is longer than the circumference of the bottle, angle the film slightly as it is taped down.
If DIY is not your thing and you are looking for processing gear for your submini films -- Minox, 16mm, 110, even DISC and APS -- for Paterson, JOBO, etc., contact FILM STUFF LAB to see if they can help:


To return to the main index for the Sub Club click here.
COPYRIGHT @ 1995-2024 by Joe McGloin. All Rights Reserved.